Showing posts with label Microsoft Office System. Show all posts

Monday, 18 July 2016

Tilde key not working in VMware fusion

Problem:

Today I ran into a small but frustrating problem. The tilde key (~) didn’t work on my VMware fusion machine.

Situation:

I run Windows 10 in VMware fusion on a Macbook Pro. I searched a bit around the internet but didn’t find the right solution. By the way, my keyboard layout is US, so the ‘~’ key should be on the key just left from the ‘1’.
Some trial and error with keyboard combination with CTRL, ALT, Winkey etc didn’t work out. Strangely enough, I got it to work on the command prompt by pressing SHIFT+ALT+`, but that didn’t work on e.g. Notepad++ and Visual Studio.

Solution:

I found out that you can fix that in the settings of the VM itself. You don’t need to shutdown you VM. Just do the following:

  • Open the Settings of you VM
  • Click on ‘Keyboard & Mouse’
  • Just under the list of Profiles, you will see a gear wheel button which you can expand.
  • Click in the gear wheel popup menu on the option ‘Edit profile’
  • In the popup window, click on the tab ‘Key Mapping’ and unselect the option ‘Enable Language Specific Key Mappings’. This will do the trick (a least for me).
  • Close all settings windows, return to your (running) VM and voila, the ‘~’ will work back again.

I assume that this will work on other Windows versions on VM's as well. Just give it a try.

Happy programming!

Tuesday, 7 August 2012

SharePoint designer workflow not updated

Today, I ran into another big SharePoint mystery (if you like mysteries, join the SharePoint world ;) ). A couple of weeks ago, I wrote a workflow in SharePoint designer (SPD) on a SharePoint Foundation environment. So far, so good.
Problem:
Today, I had to update/fix the workflow because I forgot a little step. And guess what, it didn't work. The updates on the workflow were not applied. Although a new version of the workflow was present on the site, the changed were not. Rebooting the entire SharePoint machine didn't solve this. Arghhhhhh..... But lucky me, after some search, I noticed that I was not the only one...
Solution:
It seems that SPD (sometimes = randomly I guess) forgot to empty his own application cache. A republish of a workflow is then done with the cached (=old) info. This is due to a mismatch between the server's activity and the SPD client's cached activity. So:
  1. Close SPD.
  2. Open “My Computer”.
  3. Go to %System Drive%\Documents and Settings\%user%\Local Settings\Application Data\Microsoft\WebSiteCache (If you are running Vista, that path is different - look for %System Drive%\Users\%user%\AppData\Local\Microsoft\WebSiteCache).
  4. Go to a directory that looks similar to the name of the website you were connecting to. (Alternatively, you can just delete all these directories and everything should work when you boot SPD).
  5. Delete the assembly with the name similar to the one you are changing.
  6. Boot SPD.
  7. You can now work with your updated activity.
Good luck and have fun!

Friday, 15 June 2012

IE9 and SharePoint 2010: Memory Leak!

Today, I ran into a really stupid issue. It seems that IE9 has a memory leak when using SharePoint 2010. On each refresh of a SharePoint 2010 page, the amount of used RAM is increasing by approx. 5 MB.
I found a lot of talking about it, but no solution yet.
Seems that Microsoft doesn't work on that, well at least don't let know us.
By the way, I am running Win7 x64.
Absolutely stupid. You cannot expect end-users to restart their IE9 browser a couple of times during the day. Even more ridiculous is the fact that IE8 doesn't have that issue.

Possible solution: deactivation of the ActiveX NameCtrl. Let's try that, or use another browser.

Friday, 2 September 2011

MS Word is starting fast, relatively speaking

Today, I downloaded the Process Monitor to get a bit more insight in what kind of registry key's are read when a program starts up.
Just as a kind of trial, I started MS Word 2010. Always a bit slow in starting. Well, I have to change my opinion a bit. It seems that Word needs up to more than 69.000!! registry events to start up. Well, from that point of view, it is not starting up slow... ;)

Tuesday, 19 October 2010

The list cannot be displayed in Datasheet view

Until a couple of weeks ago, I was using Office 2007 on a Windows 7 (x64). Showing SharePoint (MOSS 2007) lists in datasheet view worked fine.
Recently, I changed to Office 2010 (Prof, x64) edition. I fully uninstalled Office 2007 and installed Office 2010.
Then the following error shows up when using the datasheet view:
The list cannot be displayed in Datasheet view for one or more of the following reasons:

- A datasheet component compatible with Windows SharePoint Services is not installed.
- Your Web browser does not support ActiveX controls.
- Support for ActiveX controls is disabled.

To my surprise, the solution is to install 2007 Office System Driver: Data Connectivity Components, or with other words the Access Database Engine.
So if you love surprises, start working with SharePoint and Office ;)
BTW, I am working with IE8.

Monday, 8 March 2010

Release date SharePoint 2010 and Office 2010

Last Saturday, Microsoft announced the release date of both SharePoint 2010 en Microsoft Office 2010. Arpan Shah wrote:
"Today, we officially announced that May 12th, 2010, is the launch date for SharePoint 2010 & Office 2010. In addition, we announced our intent to RTM (Release to Manufacturing) this April 2010."

For consumers, Office 2010 will be available online and on retail shelves this June.
You can read more at http://blogs.technet.com/office2010/archive/2010/03/04/get-office-today-or-tomorrow.aspx and http://sharepoint.microsoft.com/businessproductivity/proof/pages/2010-launch-events.aspx

Friday, 8 January 2010

Edit Office Document from SharePoint in IE8 64 bit version

Have you ever tried to open a Word document from a SharePoint 2007 document library using Internet Explorer 8 64 bit edition? Today I tried, because I am running a 64 bit Windows 7 edition.
Guess what, next message was shown:


So I tried also to open a Word document from a SharePoint 2010 document library in IE8 x64. Of course, it doesn't work either. Only the message was a bit different:


Oh, by the way, I am using Office 2007 SP2. I didn't try it with Office 2010 (not installed yet). Maybe that will work? I guess not, but I let you know.
Thanks Microsoft! :(

Update:

I read on technet that the IE8 64 is a so called Level 2 brower. According to Microsoft, Web browser support is divided into two levels: level 1 and level 2. Although administrative tasks on SharePoint sites are optimized for level 1 browsers, SharePoint Server 2010 also provides support for other browsers that are frequently used. To ensure that you have complete access to all functionality, we recommend that you use a level 1 browser for administrative tasks.

So it seems that editing a Word document from SharePoint is administrative task. In SharePoint it is called 'contribution'... do you follow it?

Read more at Microsoft Technet:
http://technet.microsoft.com/en-us/library/cc263526%28office.14%29.aspx

Tuesday, 22 September 2009

Update all fields in Word, including headers and footers (Edit)

At 11th November last year, I post a piece of code to update all fields in a Word document. Some people respond that it didn't work. Well, I tried, and it seems that's true.
Today, I rewrote a new piece of code I found, and that seems to work fine. I created an extension method for the Word.Document object that does the trick.

_
Sub UpdateAllFiels(ByVal doc As Word.Document)

Dim section As Word.Section
Dim myRange As Word.Range
Dim myHF As Word.HeaderFooter

doc.Fields.Update()

For Each section In doc.Sections

For Each myHF In section.Headers
myRange = myHF.Range

For Each aField In myRange.Fields
If aField.Type = Word.WdFieldType.wdFieldDocProperty Then
aField.Update()
End If
Next aField

Next myHF

For Each myHF In section.Footers
myRange = myHF.Range

For Each aField In myRange.Fields
If aField.Type = Word.WdFieldType.wdFieldDocProperty Then
aField.Update()
End If
Next aField

Next myHF

Next section

End Sub

So, now I am able to update all fields easily in my document. In my Word Add-on, I created a own ribbon tab, I placed a button on it, which does the following:

Globals.ThisAddIn.Application.ActiveDocument.UpdateAllFiels()

Note: Extension methods is supported on .NET framework 3.5 or higher

Edit: A little fix: 'doc.Fields.Update()' added to the code. This is the regular Word Update All Fields function (so without doing Headers and Footers).

Thursday, 9 July 2009

Speed up Outlook 2007

Are you also irritated about the bad performance of Outlook 2007? Read this out.
When you are using Outlook 2007 (this is the version I am talking about), you have the option to use cache mode (previous version 2003 also). This can be helpful when you are working on e.g. a laptop. With this feature you can have you e-mail messages off-line with you.
So caching is fine, but it really slow down your Outlook performance (even your entire laptop as it seems). Switching off the cache mode (restart your Outlook) dramatically improve your Outlook performance. The startup time is much less and also, which is really unbelievable, the search option is amazingly fast. You use the search and indexing stuff of Exchange (in our case Exchange 2007) which is really fast.
We actually don't really need the off-line functionality, because Outlook Web Access 2007 is also a really good application to work with. So, if we have somewhere internet access, we can use OWA 2007 instead.

Thursday, 15 January 2009

InfoPath 2007: Showing/hiding optional sections

At the moment I am developing InfoPath forms. As most of the Microsoft products, the first version of a product is, let's say, crap. The second version, starts to look like what it should be, and the third version is more or less what it should be. Well, InfoPath 2007 is the second version of the InfoPath products, so it's not always that intuitive.
I worked with optional sections in InfoPath 2007, and I really hate the way of dealing with hiding/showing these sections based on other actions (e.g. selecting 'yes' for a field value, which should result in showing an optional section for additional information to fill in). So I decided to make life a bit easier and may be you like it as well, so I shared this. I created in VSTA an object that do the show/hide actions for me.

1. Public enumeration
First of all, create a public enumeration for targeting optional sections. Place it straight under the Namespace tag (not in the FormCode class). By the way, in this example, we assume that the namespace is called MyCustomNamespace.

'''
''' Public enumeration for targeting optional sections
'''

'''
Public Enum TargetSection
PartnerDetails
CurrentStudyDetails
ClubMemberships
End Enum

2. Create object class
Create an object class to hold optional section items. This class contains a couple of private fields, one public property and some (public) methods.
The ViewContext represents the Context Id, XPath represents the XPath query string and XOptional is the Control Id. All are generated by InfoPath. The target section is a value of the enumeration, created in step one.

''' <summary>
''' Class for easy hide and show of Optional Sections
''' </summary>
''' <remarks></remarks>
Public Class OptionalSection

Private mViewContext As String
Private mXPath As String
Private mXOptional As String
Private mTargetSection As TargetSection
Private mVisible As Boolean

Public ReadOnly Property TargetSection() As TargetSection
Get
Return mTargetSection
End Get
End Property

''' <summary>
''' Constructor
''' </summary>
''' <param name="viewContext">Context id</param>
''' <param name="xPath">XPath query string</param>
''' <param name="xOptional">Control id</param>
''' <param name="targetSection">Pinpoint to target optional
''' section</param>
''' <remarks></remarks>
Public Sub New(ByVal viewContext As String, ByVal xPath As String, _
ByVal xOptional As String, _
ByVal targetSection As TargetSection)
mViewContext = viewContext
mXPath = xPath
mXOptional = xOptional
mTargetSection = targetSection
mVisible = False
End Sub

''' <summary>
''' Show the optional section
''' </summary>
''' <param name="myForm">The current FormCode class</param>
''' <remarks>Check if section is already visible. Infopath crashes if
''' it is already visible</remarks>
Public Sub Show(ByVal myForm As MyCustomNamespace.FormCode)
If Not mVisible Then
myForm.CurrentView.ExecuteAction( _
ActionType.XOptionalInsert, mXOptional)
mVisible = True
End If
End Sub

''' <summary>
''' Hide the optional section
''' </summary>
''' <param name="myForm">The current FormCode class</param>
''' <remarks>Check if section is already invisible. Infopath crashes
''' when trying to hide an invisible</remarks>
Public Sub Hide(ByVal myForm As MyCustomNamespace.FormCode)
If mVisible Then
Dim node As XPathNavigator = _
myForm.MainDataSource.CreateNavigator() _
.SelectSingleNode(mXPath, myForm.NamespaceManager)

myForm.CurrentView.SelectNodes( _
node, node, mViewContext)
myForm.CurrentView.ExecuteAction( _
ActionType.XOptionalRemove, mXOptional)
mVisible = False
End If
End Sub
End Class

3. Add some code
Add the following imports at the top of the source code:

Imports System.Collections.Generic

Create a private variable in the FormCode class that holds a list of optional section objects:

Private OptionalSections As List(Of OptionalSection)

4. Create optional section list
Create a method in the FormCode classto create a list of the just created optional section object. In this example, the form contains three optional sections which are needed to be shown/hide. For each optional section you need to show/hide, just create an object in this place and add it to the object list.

'''
''' Create and fill the optional sections list
'''

'''
Private Sub CreateOptionalSectionList()
OptionalSections = New List(Of OptionalSection)
OptionalSections.Add( _
New OptionalSection("CTRL31", _
"/my:MyFields/my:PersonalInformation/my:Partner", _
"Partner_33", _
TargetSection.Partner))
OptionalSections.Add( _
New OptionalSection("CTRL111", _
"/my:MyFields/my:Education/my:CurrentStudies/my:CurrentStudy", _
"CurrentStudy_121", _
TargetSection.HuidigeStudieDetails))
OptionalSections.Add( _
New OptionalSection("CTRL282", _
"/my:MyFields/my:Others/my:ClubMemberships", _
"ClubMemberships_269", _
TargetSection.Verenigingen))
End Sub

The information of the parameters, you can find at the advanced tab on the section properties dialog. Here you can find the ViewContext and the XmlToEdit for xOptional. The XPath string is easy to get. Right-click on your group on the data source list (this group represents the optional region) and select Copy XPath in the context menu. The XPath query is now on your clipboard.

Call the CreateOptionalSectionList during the InternalStartup method of the FormCode class.
5. GetOptionalSection

Create a function to retrieve the optional section you are interested in:


''' <summary>
''' Get the target optional section
''' </summary>
''' <param name="section">Target optional section</param>
''' <returns>Optional Section object</returns>
''' <remarks></remarks>
Private Function GetOptionalSection( _
ByVal section As TargetSection) As OptionalSection

For Each os As OptionalSection In OptionalSections
If os.TargetSection = section Then
Return os
End If
Next
Return Nothing
End Function

6. Show/hide optional section

Now you are ready for easily showing and hiding optional regions. For example, if the field MemberOfClub changed (in this example a Boolean field), you want to fire an event for showing or hiding a corresponding region where the user can fill in his club membership information.


''' <summary>
''' Show or hide the ‘Club membership’ optional section
''' </summary>
''' <param name="sender"></param>
''' <param name="e"></param>
''' <remarks></remarks>
Public Sub MemberOfClub_Changed( _
ByVal sender As Object, ByVal e As XmlEventArgs)

Try
If e.NewValue = "true" Then
GetOptionalSection(TargetSection.ClubMemberships).Show(Me)
Else
GetOptionalSection(TargetSection.ClubMemberships).Hide(Me)
End If
Catch ex As Exception
End Try
End Sub

This is the way I am dealing with a lot of optional sections I want to show/hide.

Tuesday, 11 November 2008

Update all fields in Word, including headers and footers

The regular 'update all fields' method in Word does not update used fields in the headers and footers. I searched on the internet to find a proper method and I found some code, but almost every time, they didn't really do what they are supposed to do. I found one piece of code which will update the fields in headers and footers. I combined it with the normal update procedure and now I have one method to update all field:


Public Sub UpdateAllFields()
Dim currentDocument As Document _
= Globals.DnmOfficeAddIn.Application.ActiveDocument
If currentDocument IsNot Nothing Then
Dim aStory As Range
Dim NumberOfFields As Integer = 0

Cursor.Current = Cursors.WaitCursor
Try
For Each aStory In currentDocument.StoryRanges
NumberOfFields += aStory.Fields.Count
Next

If NumberOfFields > 0 Then
'Update all available fields in the document
For Each aStory In currentDocument.StoryRanges
aStory.Fields.Update()
Next

Dim section As Section
Dim DocumentRange As Range
Dim DocumentHeaderFooter As HeaderFooter

' Loop through the header/footer for each section.
' If this isn't done specifically, Word seems to
' skip the header/footer of sections after section 1.
For Each section In currentDocument.Sections
For Each DocumentHeaderFooter In section.Headers

DocumentRange = DocumentHeaderFooter.Range
For Each aField As Field In DocumentRange.Fields

If aField.Type = WdFieldType.wdFieldDocProperty Then
aField.Update()
End If

Next aField

Next DocumentHeaderFooter

For Each DocumentHeaderFooter In section.Footers

DocumentRange = DocumentHeaderFooter.Range
For Each aField As Field In DocumentRange.Fields

If aField.Type = WdFieldType.wdFieldDocProperty Then
aField.Update()
End If

Next aField

Next DocumentHeaderFooter

Next section
Else
MessageBox.Show( _
"This document does not contain any updatable fields.", _
"No fields", MessageBoxButtons.OK, _
MessageBoxIcon.Information)
End If
Finally
Cursor.Current = Cursors.Default
End Try
End If
End Sub

Good luck!


(By the way, I used this code in a Office 2007 environment)


EDIT: See my latest blog for a working version: http://blog.vanmeeuwen-online.nl/2009/09/update-all-fields-in-word-including.html

Wednesday, 1 October 2008

Building Office 2007 add-in failed due to missing dll's

I had worked some time on a Word 2007 add-in in Visual Studio 2008. After a while, it did not work anymore. I got the following error:


Error 1 The "VerifyClickOnceSigningSettings" task could not be instantiated from the assembly
"Microsoft.VisualStudio.Tools.Applications.BuildTasks, Version=9.0.0.0, Culture=neutral, PublicKeyToken=b03f5f7f11d50a3a". System.TypeInitializationException: The type initializer for
'Microsoft.VisualStudio.Tools.Applications.Hosting.CodeGeneration.VerifyClickOnceSigningSettings'
threw an exception. ---> System.IO.FileNotFoundException:
Could not load file or assembly 'Microsoft.VisualStudio.Tools.Applications.Hosting.v9.0,
Version=9.0.0.0, Culture=neutral, PublicKeyToken=b03f5f7f11d50a3a'
or one of its dependencies. The system cannot find the file specified. File name: 'Microsoft.VisualStudio.Tools.Applications.Hosting.v9.0, Version=9.0.0.0, Culture=neutral, PublicKeyToken=b03f5f7f11d50a3a' at Microsoft.VisualStudio.Tools.Applications.Hosting.CodeGeneration.VerifyClickOnceSigningSettings..cctor()

Unfortunately, there was almost no documentation on this error. I tried a 'correction' setup and also run the SP1, but that didn't work out. Finally, I found it on http://www.tech-archive.net/. You need to download the Microsoft Visual Studio Tools for the Microsoft Office system (version 3.0 Runtime) (x86) (download here). Run this setup and this will fix the problems.

Don't ask me why it worked before and later on not anymore, I don't know. MS stupidities perhaps? ;)

Wednesday, 2 July 2008

Document Properties as Content Control

(This article applies to Microsoft Word 2007)

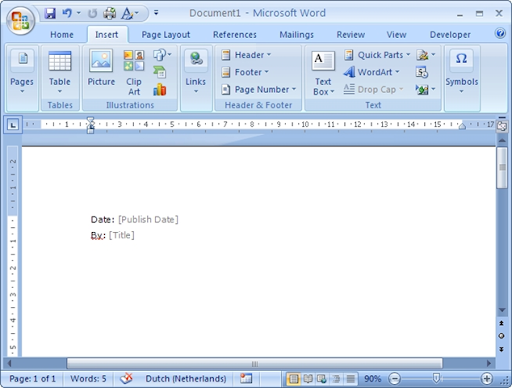
In Word 2007, you can add document properties as a content control (insert -> quick part object) in your document. For example, you can add publish date and the title as shown in following figure:

image

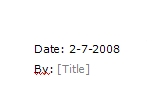
These document properties can be edited directly in the document:

image image

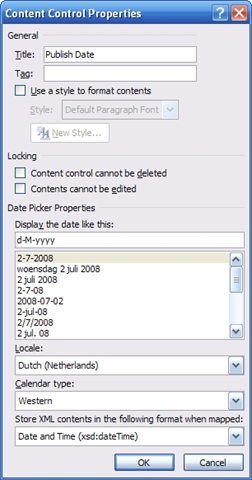
But if you are not happy with the way the date is presented (the format), you can change this. Therefore you need the ribbon menu Developer. Go to this tab, and click on the Properties button. The following property pallet is shown.

imageIn this window you can change to the date format you like.

Friday, 6 June 2008

How to solve problems with Interop.Excel after uninstalling Office 2007 and installing Office 2003?

How to solve problems with Interop.Excel after uninstalling Office 2007 and installing Office 2003?

In one of our projects, we are using the Excel interop functionality to import data from an Excel sheet into the application (and after that into a database). If you work with Office 2007 and you need to deploy your application for Office 2003 environment, you catch some problems, like:

************** Exception Text **************
System.InvalidCastException: Unable to cast COM object of type 'Microsoft.Office.Interop.Excel.ApplicationClass' to interface type 'Microsoft.Office.Interop.Excel._Application'. This operation failed because the QueryInterface call on the COM component for the interface with IID '{000208D5-0000-0000-C000-000000000046}' failed due to the following error: could not be found. (Exception from HRESULT: 0x80030002 (STG_E_FILENOTFOUND)).
at Microsoft.Office.Interop.Excel.ApplicationClass.get_Workbooks()
at RunExcel.Form1.btnRunOutsideForm_Click(Object sender, EventArgs e) in D:\FMI\Dev\NetPlay\VS2005\RunExcel2003\RunExcel\Form1.vb:line 22
at System.Windows.Forms.Control.OnClick(EventArgs e)

My colleague worked on a PC with Office 2003 and I am working on a PC with (only) Office 2007. We both using Visual Studio 2005 (SP1) and both of us are working on the same project. To solve this problem we discover the following way through:

During debugging, my colleague got his "Interop.Excel.dll" file (from Excel 2003) in the debug folder.
I took a copy of this dll and place it in the project folder. I removed all Office200x references in the project and add a reference to the "Interop.Excel.dll".

Note: use the following imports-statement in this case: Imports Excel

Wednesday, 4 June 2008

Outlook in SharePoint or Website

In SharePoint you can use the standard web parts for displaying e.g. your outlook inbox or tasks. This web part is actually quit limited. Use the following tags for better (end) user experience:


<P>
<OBJECT classid="CLSID:0006F063-0000-0000-C000-000000000046"
width="100%">
<param name="Folder" value="Inbox">
</OBJECT>
</P>
<P>
<OBJECT classid="CLSID:0006F063-0000-0000-C000-000000000046"
width="100%">
<param name="Folder" value="Tasks">
</OBJECT>
</P>

Those tags shows a control displaying your inbox and tasks.

See more information at My Calendar in SPS Home Page. Note: you should have Outlook installed on the machine that you are using to view the SharePoint site or web site.

Tuesday, 3 June 2008

SharePoint Search inside Word 2007

Using the SharePoint search inside (for example) Microsoft Word 2007 is really easy to configure and can be useful. In my situation, we have WSS 3.0 and MOSS 2007 installed.

Start Word 2007 and go to the Review tab and click under Proofing on the Research button. The research task pane will open:

image

Click on Research Options... at the bottom of the research task pane. Click on Add services on the window Research Options:

image

In the address text box on the Add Services window type the uppermost url of your MOSS site, e.g. http://intranet/ and add _vti_bin/search.asmx to get the search web service of MOSS (the address should look like this: http://intranet/_vti_bin/search.asmx) and click on Add. You can use also an sub site or other site collection to narrow your search scope.

image

Word is now getting the service information, this can take a moment. Press on Install on the Microsoft Office SharePoint Server 2007 Search Setup to confirm the use of this service. Now you are back on the Research Options window. Scroll to the bottom and you will find your newly added search service. Press OK to close this window.

image

Now you are ready to use the SharePoint search inside Word 2007. When doing research, you can specify the scope where you want to search, for example newly made SharePoint search (in my example it is automatically called intranet because of the site title)

image

You are done! Now you can use SharePoint search without leaving Word 2007. The search results are exactly the same as when you use the SharePoint Search inside the web browser.

Saturday, 17 May 2008

Oracle Database Link to MS Access

(Originally posted at May 19th, 2008 by Robje)

In this post, I describe how you can make an Oracle database link to an MS Access database. When done, you can query from an oracle database onto an Access database. But with some little changes, you can do the same trick to a SQL Server database or even a database type you like (to which you can connect by ODBC).

Important: The init-parameter GLOBAL_NAMES should have value FALSE. Check this parameter first before continuing the procedure.

In this example, I uses TESTDB as database name, replace this with your database/name/user id. If I mention %oracle_home%, I mean the Oracle Home directory. This example is worked out on an Oracle 8.1.7.4 installation, but I suppose it will work on higher Oracle versions too.


1. Create a new ODBC link

  1. On the Oracle server start the ODBC Data Source Administrator. This can be done by using the run command: go to start/run and type odbcad32 and press enter.
  2. In the ODBC Data Source Administrator window go to the System DSN tab and click on Add...
  3. Choose in the Create New Data Source window the Microsoft Access Driver (*.mdb) and click on Finish.
  4. In the ODBC Microsoft Access Setup window enter the data source name (e.g. TESTDB), the description (e.g. Test database) and select the Access database
    1. If the Access database is on the same machine as Oracle is running, you can ignore step 1.5 and step 2!
  5. If the Access database is on another machine in the network, you should use UNC-path notation. In the Map Network Drive window, leave the drive-letter on (none) and select via the UNC-path the Access database. Finish the creation of the ODBC Link and close all the ODBC windows.

2. Create Network ID

In order to perform a good connection to the Access database on another machine, you need to follow the following steps:

  1. Create on the network an user id (e.g. TestDbAdmin) and give this UID read rights on the location of the Access files. NOTE: use the appropriate rights, this depends on the actions you want to take on the Access database.
  2. Place this user, TestDbAdmin, in the ORA_DBA group on the Oracle server.

3. Create the Oracle TestDb listener

In these steps, some Oracle files will be created and/or modified. A new listener will be created, which will take care of the connection

1. Open the file inithsodbc.ora (%oracle_home%/hs/admin) and save this as initTESTDB.ora. Edit the content so it looks like:


# This is a sample agent init file that contains the HS parameters that
# are needed for an ODBC Agent.
#
# HS init parameters
#
HS_FDS_CONNECT_INFO = HORSODBC
HS_FDS_TRACE_LEVEL = OFF
#
# Environment variables required for the non-Oracle system
#
#set <envvar>=<value>

2. Open the file listener.ora (%oracle_home%/network/admin) and add the following text, save and close the file:


LISTENERTESTDB =
(ADDRESS_LIST=
(ADDRESS=(PROTOCOL=tcp)(HOST=localhost)(PORT=1522))
(ADDRESS=(PROTOCOL=ipc)(KEY=PNPKEY))
)
SID_LIST_LISTENERTESTDB=
(SID_LIST=
(SID_DESC=
(SID_NAME=TESTDB)
(ORACLE_HOME = C:\oracle\ora81)
(PROGRAM=hsodbc)
)
)

3. Open the file tnsnames.ora (%oracle_home%/network/admin) and add the following text, save and close the file:


TESTDB =
(DESCRIPTION =
(ADDRESS = (PROTOCOL = tcp)(HOST = localhost)(PORT = 1522))
(CONNECT_DATA =
(SID = TESTDB)
)
(HS = OK)
)

4. Check the file sqlnet.ora (%oracle_home%/network/admin) if the following setting is correct (correct if it differs):


SQLNET.AUTHENTICATION_SERVICES= (NONE)

5. Start the new TESTDB listener with the following command (on the command line tool):


NOTE: DON'T USE A RDP (REMOTE DESKTOP) CONNECTION! Because of windows credential error. Apply this directly on the Oracle machine or via e.g. VNC Viewer connection.

Orahome\bin\lsnrctl start listenerTestDb

Starting the new listener can produce an error message, because the services uses the default logon settings (system account).

6. Configure the ListenerTestDb:

  • Open the properties panel of this service (can be found in the windows services list at the administrative tools)
  • Stop the service (if it is running) and edit the log on credentials to the user account earlier made (e.g. TestDbAdmin)
  • (Re)start the service.

7. Test the listener with the following statement:


%oracle_home%\bin\tnsping testdb

If the test succeeded, the database link in Oracle can be made.


4. Create Oracle Database Link to TestDb


1. Create database link to TESTDB (note: credentials SYSTEM/MANGER can be changed to your configuration):


CREATE PUBLIC DATABASE LINK “TESTDB”
CONNECT TO "SYSTEM"
IDENTIFIED BY "MANAGER"
USING 'TESTDB'

2. Test the link with a count(*) query to a table on the TESTDB database.

If you got a number of rows back, you're done!


(with thanks to my colleague Frank den Outer)